Stunning Ways to Style and Customize Black Built In Living Room Shelves
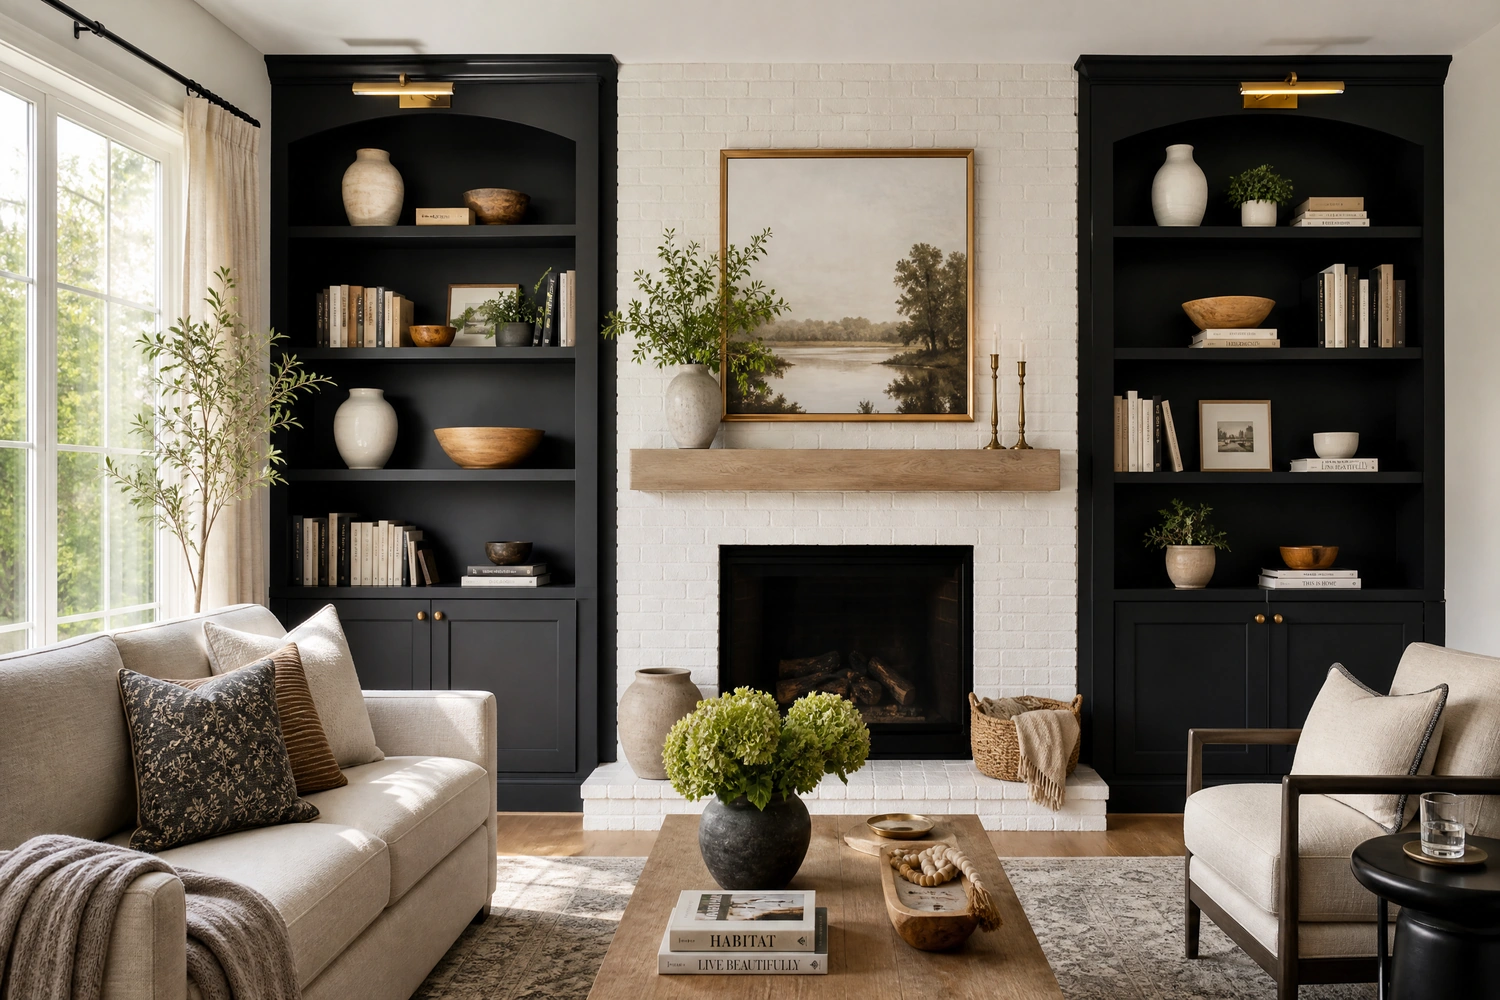
Black built-in shelving units bring a bold, architectural presence to a living room, serving as a massive focal point that anchors the entire space. The dark color creates a rich backdrop that highlights your books, artwork, and collectibles, making them stand out clearly. However, styling a solid black wall can feel intimidating because the dark color can quickly make a room feel heavy or dark if not styled correctly.
If you are planning to install black built-ins or want to update your existing dark shelves, you face unique decorating questions. Many homeowners struggle with balancing the dark color, choosing the right metallic hardware, or organizing the shelves to avoid a cluttered look. To help you design a beautiful and balanced display, we put together a large list of practical black built-in ideas. We share straightforward advice on adding lighting, choosing decor, and mixing materials.
Install Warm LED Strip Lighting Under Shelves

Adding thin LED light strips underneath each shelf is a fantastic way to brighten up the dark recesses of black built-ins. The glowing light washes down over your books and decorative items, highlighting their shapes and colors against the black wood. This secondary lighting also creates a cozy, relaxing ambiance in the living room during the evening.
Choose LED strips that offer a warm white light rather than a cool blue tone to keep the dark wood looking cozy and inviting. You can hide the thin electrical wires behind the back panels of the shelving unit to keep the installation looking clean.
Dust will easily show up on the plastic light strips, which can block the light and make the glow look dim or uneven. Wiping the light strips gently with a dry microfiber cloth every few weeks removes dust buildup. You must ensure the adhesive backing remains stuck flat to the underside of the shelves.
QUICK TIP: Buy LED light strips with a built-in dimmer function so you can easily adjust the brightness of the shelves to match the room’s mood.
Use White Marble Wallpaper on the Back Panel

Lining the interior back panels of your black built-ins with white marble wallpaper creates a luxurious, high-contrast look. The bright white background breaks up the solid black structure, making the shelves look lighter and more open. The subtle grey veining of the marble adds an elegant texture that contrasts nicely with the dark wood.
You can use renter-friendly peel-and-stick wallpaper to cover the back panels easily without damaging the wood underneath. Apply the wallpaper panels carefully, using a plastic smoother to press out any air bubbles for a clean finish.
Wallpaper seams can lift or bubble over time if exposed to drafts or direct sunlight from nearby windows. You should run your hand along the seams occasionally to ensure the adhesive paper remains flat. Wiping the wallpaper surface gently with a slightly damp cloth removes dust without damaging the print.
DESIGNER ADVICE: Choose a wallpaper pattern with a large, subtle print rather than a busy pattern to prevent the shelves from looking cluttered.
Paint the Interior Backing a Contrasting Gray

Painting the interior backing of your built-ins a soft, charcoal grey is a subtle way to add depth to the black structure. The slight color difference breaks up the massive block of solid black paint, making the shelves look detailed and custom-built. The dark grey tone provides a softer backdrop that looks incredibly sophisticated.
Use a durable satin paint finish for the backing to create a slight contrast in sheen against matte black shelves. Ensure you paint the backing boards before installing the shelves to make the project much easier and cleaner.
Dark painted backings show dust and lint easily, which can make the shelves look messy if neglected. You must run a dry dusting brush along the corners of the shelves every few weeks to keep the paint looking fresh. Touching up minor scuffs with a small paint pen keeps the built-ins looking pristine.
STYLE SECRET: Match the contrasting grey paint to your living room sofa fabric to tie the built-in shelves directly into the room’s color scheme.
Add Knurled Brass Cabinet Knobs

Replacing standard black handles with knurled brass knobs on the lower cabinets adds a gorgeous pop of gold texture. The shiny brass stands out brilliantly against the dark black doors, acting like jewelry for the furniture. The textured, knurled pattern brings a modern industrial detail that feels expensive and customized.
Installing new cabinet hardware is a quick project that requires only a screwdriver to attach the new brass pieces. Ensure the knobs are tightened securely to the door frame so they do not wobble during daily use.
Polished brass hardware can show dirty fingerprints and tarnish over time, which can dull the bright metallic gold color. You should wipe the knobs with a dry microfiber cloth occasionally to keep them looking clean and shiny. Avoid using harsh chemical cleaners that can strip the protective finish off the brass.
QUICK TIP: Choose knurled brass hardware with a clear protective lacquer coating to prevent the metal from tarnishing or discoloring over time.
Frame the Center Television with Thick Molding
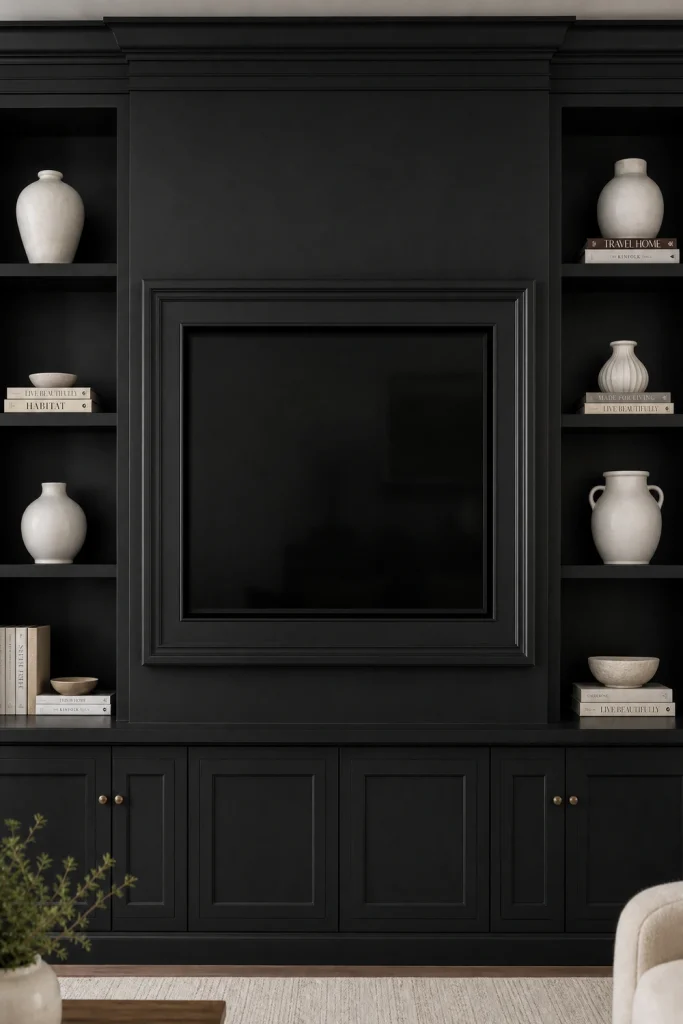
Designing your built-ins to frame a central television with thick wooden molding helps the large screen blend into the dark shelving. The black paint makes the television screen almost invisible when it is turned off, reducing its visual impact in the room. The decorative molding creates a clean, custom border that looks highly professional.
Install the molding border snugly around the television wall mount, leaving enough space for ventilation to prevent overheating. Paint the molding the exact same black color as the shelves to create a seamless look.
Dust will collect quickly on the horizontal ledges of the molding and behind the television screen. Because this is the central focus of your living room, keeping it clean is important for a tidy appearance. Wiping the molding and the television frame with a dry cloth removes dust easily.
SAFETY WARNING: Ensure there is a gap of at least two inches around the television to allow hot air to escape and prevent the electronics from overheating.
Display Pale Oak Wood Bowls

Placing pale oak wood bowls on your black shelves introduces a beautiful, light organic texture that breaks up the dark wood. The blonde oak color stands out clearly against the black paint, bringing warmth and natural beauty to the display. Displaying functional wooden bowls makes the shelving unit feel relaxed and inviting.
Group a couple of wooden bowls of different sizes together on a shelf, or use a large bowl to hold decorative stone spheres. The smooth, matte finish of the oak contrasts nicely with the dark painted shelves.
Natural wood can dry out, crack, or collect dust in the crevices of the wood grain if neglected. You should wipe the wooden bowls with a dry cloth weekly and avoid exposing them to direct sunlight. Rubbing the wood with food-safe mineral oil once a year keeps the oak looking nourished.
DESIGNER ADVICE: Use a light oak bowl on a shelf that sits at eye level so the beautiful natural wood grain is easily visible to guests.
Hang a Large Colorful Abstract Canvas in the Center
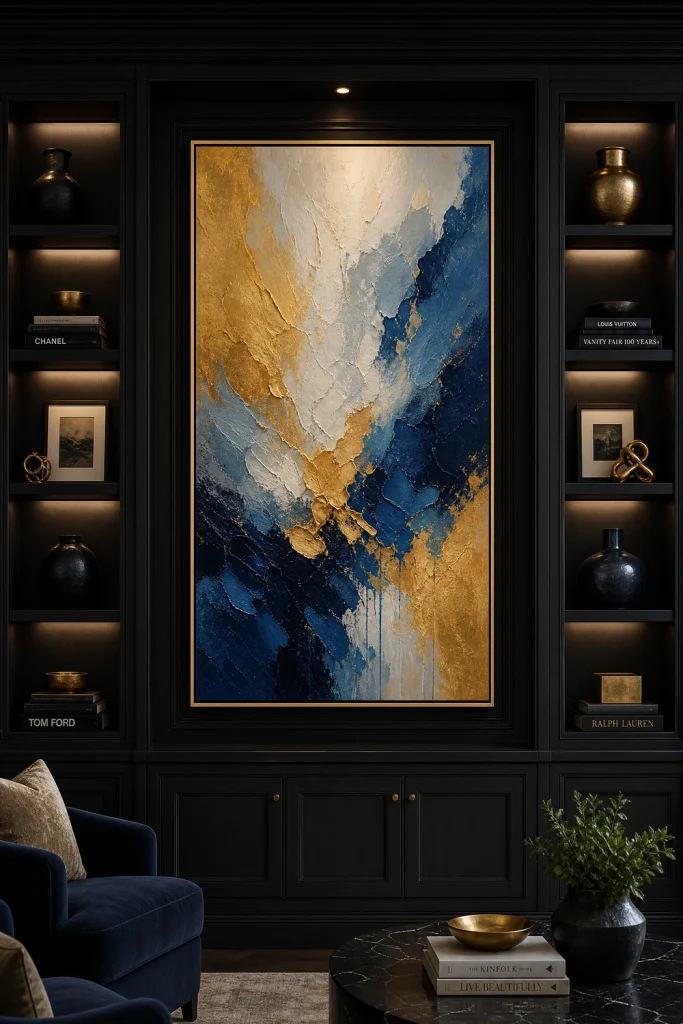
Hanging a large, colorful abstract painting in the central alcove of your built-ins creates a stunning focal point. The bright paint colors on the canvas break up the dark black shelving, bringing life and energy to the living room. The black wood frame acts like a strong border that highlights the artwork.
Mount the canvas securely in the center of the built-ins, ensuring it is centered and level. Choose a painting that features a mix of warm and cool colors to tie different elements of the room together.
The top edge of the canvas frame and the artwork surface will collect dust over time, making the colors look dull. A dirty art frame will take away from the clean look of the built-in display. Dusting the frame and the canvas gently with a soft feather duster keeps the artwork looking vibrant.
QUICK TIP: Choose a floating frame for the canvas in a light wood or gold finish to add an extra layer of contrast against the black built-ins.
Stack Books Vertically and Horizontally
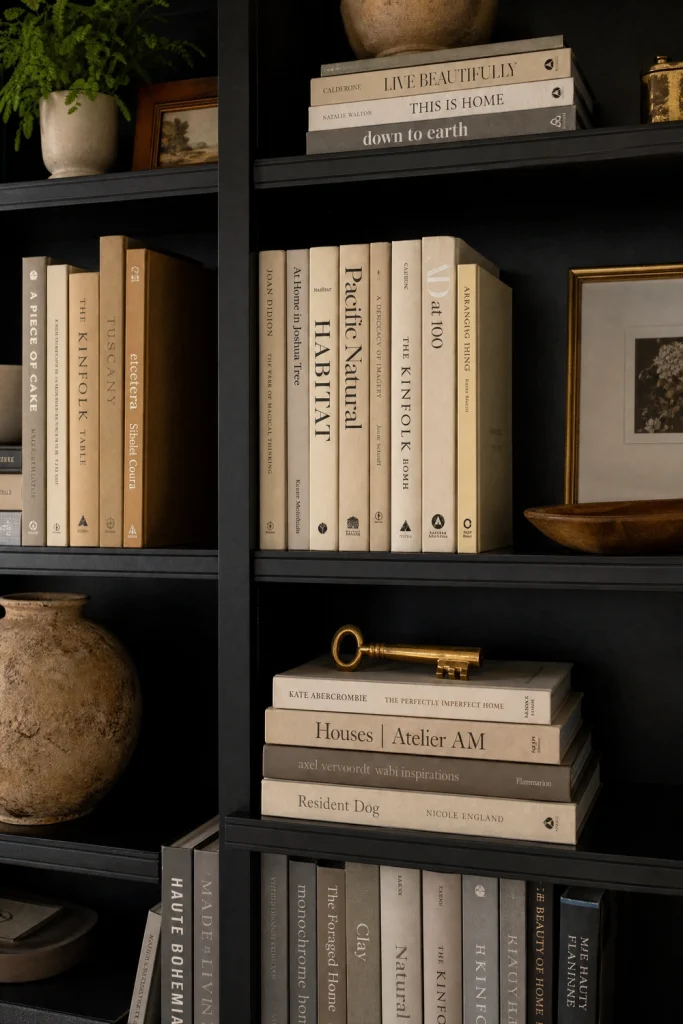
Arranging your books in both vertical stacks and horizontal piles adds variety and breaks up the rigid grid of the shelves. Alternating the direction of the books creates a dynamic look that makes the shelves look interesting rather than uniform. You can use the horizontal book stacks as pedestals to display small decorative items.
Group books by spine color to create clean blocks of color that stand out against the black background. Place a small brass sculpture or a ceramic bowl on top of a horizontal stack to complete the look.
Book spines can fade over time if exposed to direct sunlight from nearby windows, which can ruin the look of your display. You should dust the top edges of the books weekly to prevent dirt from settling on the paper pages. Keeping the books aligned neatly keeps the display looking tidy.
STYLE SECRET: Remove the paper dust jackets from your hardcover books to show the beautiful fabric textures and gold lettering on the spines.
Position Brass Picture Lights Over the Top Header
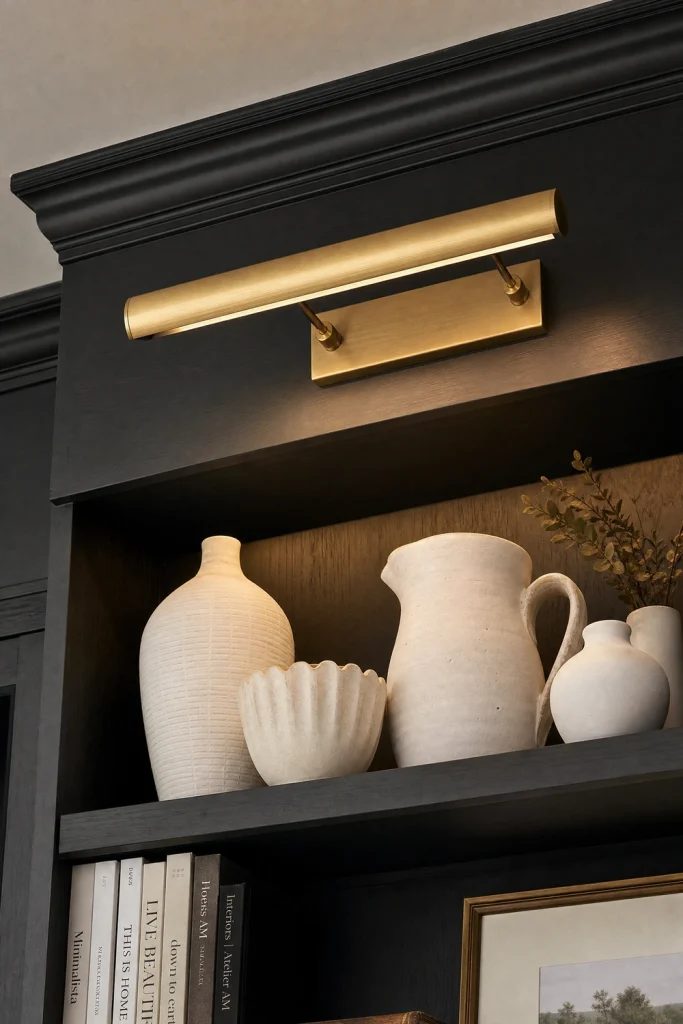
Mounting sleek brass picture lights over the top header of your built-ins casts a warm, elegant wash of light down the shelves. The golden brass fixtures stand out sharply against the black trim, adding an architectural detail to the top of the unit. The downward light highlights your displayed items beautifully during the evening.
An electrician should wire the picture lights to a dimmer switch so you can easily adjust the brightness of the display. Position one light over each vertical section of shelves to ensure the light is distributed evenly.
Dust will collect quickly on the metal shades of the picture lights, which can dull the shiny brass surface. Because the lights are mounted high on the wall, they are highly visible and must be kept clean. Wiping the brass fixtures with a dry microfiber cloth restores their clean, polished appearance.
SAFETY WARNING: Always ensure the electrical wiring for the picture lights is installed according to local building codes to prevent fire hazards.
Install Glass Cabinet Doors on the Upper Shelves

Installing glass-front doors on the upper shelves of your built-ins adds a clean, reflective surface that brightens the dark wood. The transparent glass protects your delicate collectibles from dust while allowing them to be displayed clearly. The glass panes reflect light from your windows, making the living room feel open.
Choose doors with simple black wood frames to match the shelves, keeping the look modern and streamlined. You can install hidden LED puck lights inside the glass cabinets to illuminate your displayed glassware in the evening.
Glass cabinet doors will quickly show dusty fingerprints, pet hair, and smudges from daily use. A dirty glass pane will make the entire built-in display look neglected and messy. Wiping the glass surfaces weekly with a standard window cleaner and a microfiber cloth restores their crystal clear appearance.
MAINTENANCE RULE: Clean the glass door panels on both the inside and outside to remove the film of dust that settles from the bathroom or kitchen air.
Rest White Ceramic Vases of Varying Shapes

Displaying a collection of smooth white ceramic vases on your black shelves creates a striking, high-contrast display. The bright white ceramic stands out sharply against the black paint, drawing the eye directly to the shelves. Grouping vases of different shapes and heights creates an artistic look that feels modern and clean.
Arrange three white vases in a small cluster on a shelf, keeping the arrangement asymmetrical for a relaxed look. You can leave the vases empty to highlight their sculptural shapes, or add a single dry branch for extra height.
White ceramic vases easily show dusty fingerprints, dark lint, and pet hair over time. Because they sit against a dark background, the contrast makes dust highly visible. Wiping the vases down with a damp microfiber cloth restores their clean, matte white appearance without scratching the ceramic finish.
QUICK TIP: Use vases with a matte or unglazed ceramic finish to create a soft, modern contrast against the smooth black shelves.
Use Woven Cane Webbing on Lower Cabinet Doors

Incorporating woven cane webbing into the lower cabinet doors adds a beautiful, airy texture and a light tan color. The natural cane contrast breaks up the solid black cabinets, making the lower section of the built-ins look light and detailed. Woven cane brings a relaxed, organic feel that warms up the dark wood.
You can replace the solid wood panels of your lower cabinet doors with cane webbing using a staple gun and wood trim. The woven pattern allows remote control signals to pass through, making it perfect for hiding media equipment out of sight.
Woven cane has many small crevices that can gather dust, pet hair, and dirt over time. You must handle the cane panels gently to prevent the thin wooden strips from breaking or sagging. Vacuuming the cane webbing with a soft brush attachment is the best way to clean the tight weave safely.
DESIGNER ADVICE: Soak the cane webbing in warm water before installing it; it will shrink and tighten flat as it dries, creating a professional finish.
Paint the Shelves a Soft Matte Black Finish

Painting your built-ins a soft matte or eggshell black finish is a smart way to create a modern look. A matte finish absorbs light rather than reflecting it, preventing harsh glare from room lamps or windows from showing on the shelves. The soft finish looks rich and makes the dark wood look custom-built.
Select a high-quality paint that features scuff-resistant properties to ensure the shelves hold up to moving books and decor. Paint the shelves using a foam roller to get a smooth finish without visible brush marks.
Matte paint finishes can easily show oily fingerprints, white dust, and chalky marks from rubbing objects. Because the shelves are used frequently, you must clean them gently to prevent the paint from looking patchy. Wiping the shelves with a damp cloth and a mild soap solution removes smudges easily.
SAFETY WARNING: Always ensure the room is well-ventilated when painting the built-ins, and allow the paint to cure completely before placing heavy items on the shelves.
Add a Built In Desk in the Lower Section
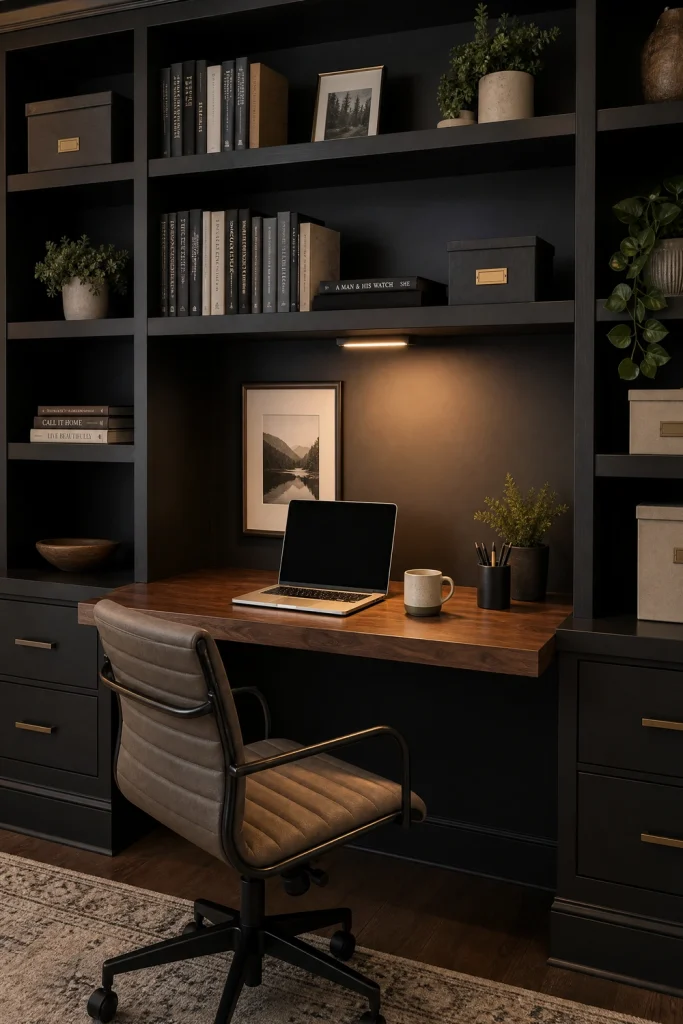
Integrating a small writing desk into the lower section of your built-ins is a great way to utilize space. The desk area fits seamlessly into the shelving unit, offering a functional home office space without cluttering the living room floor. The black paint makes the desk area look cohesive and stylish.
Install a thick wooden desktop, like warm walnut or oak, to create a durable workspace and add a contrasting wood tone. You should install a small LED task light under the shelf above the desk to illuminate your work area.
A desk surface will quickly collect papers, laptop cords, and coffee mugs, making the living room look cluttered. You must keep the desk area tidy to maintain the organized look of the built-ins. Wiping the desktop daily with a damp cloth keeps the workspace clean and ready to use.
QUICK TIP: Drill a small hole in the back of the desktop and install a plastic grommet to run computer cords out of sight.
Style with Muted Green Potted Plants
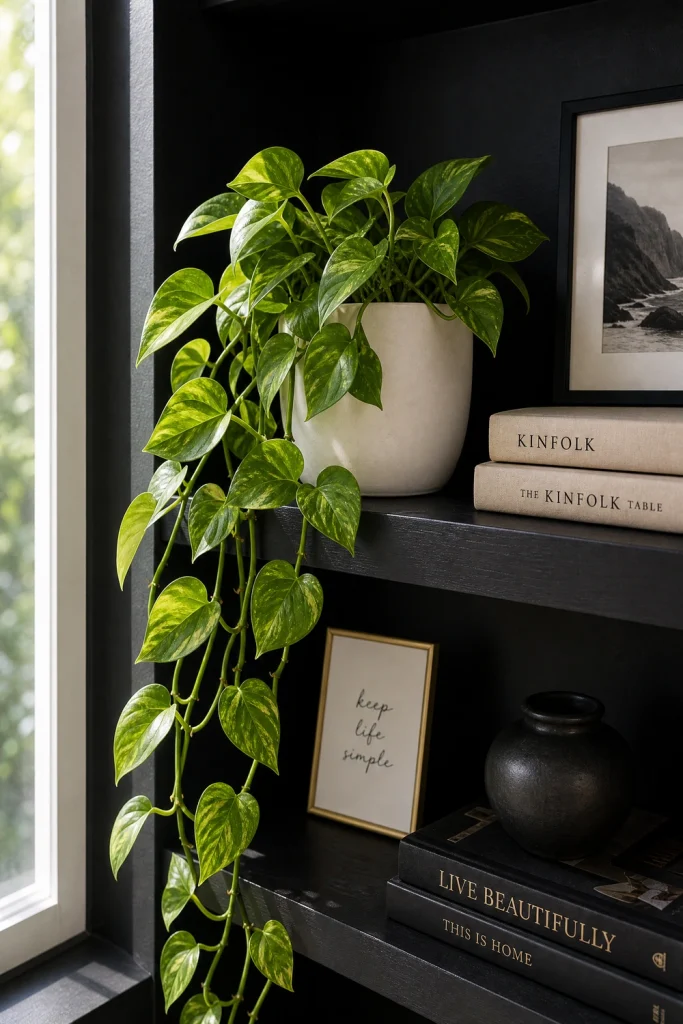
Placing a few small potted plants on your shelves introduces a beautiful, natural color that pops against matte black paint. The rich green leaves look striking against the dark background, bringing life and fresh energy to the display. Plants soften the straight lines of the shelves, making the unit feel inviting.
Select low-maintenance plants that handle indirect light well, like a pothos or a small ZZ plant. Put the plastic plant pots inside simple ceramic planters in cream or terracotta to match your color scheme.
Watering plants on wooden shelves can lead to water spills that can damage the paint and warp the wood. You must use planters without drainage holes or place waterproof saucers underneath the pots to catch excess water. Wiping the green leaves with a damp cloth removes dust and keeps the plants healthy.
DESIGNER ADVICE: Place trailing plants on the higher shelves so the green vines can cascade down and break up the vertical lines of the built-ins.
Place Gold Geometric Metal Sculptures

Displaying gold geometric metal sculptures on your black shelves adds a modern design element and a touch of shine. The shiny gold metal stands out sharply against the black paint, catching the light from your windows. These sculptures fill empty shelf space, making the display look styled and interesting.
Use sculptures with thin metal frames, like a gold wire sphere or a geometric cube, to keep the display looking light. The open design allows you to see the black background through the sculpture, preventing the shelf from looking crowded.
Shiny metal decorative items easily show dusty fingerprints, pet hair, and smudges from daily use. Because they sit against a dark background, the contrast makes dust highly visible on the gold surfaces. Wiping the sculptures with a dry microfiber cloth restores their sparkling, highly reflective clarity.
STYLE SECRET: Pair a gold geometric sculpture with a matching brass picture light to tie the metallic gold accents together across the unit.
Mount a Sliding Ladder on a Brass Rail

Mounting a sliding wooden ladder on a shiny brass rail adds classic library charm and access to high shelves. The ladder slides smoothly along the front of the built-ins, making it easy to reach books on the highest shelves safely. The warm brass rail adds a beautiful horizontal line that breaks up the black wood.
You should hire a professional to install the heavy metal rail securely to the top header of the built-in unit. Choose a ladder made from oak or stained wood that coordinates with other wood elements in the living room.
The rollers on the ladder and the brass rail will gather dust and require maintenance to slide smoothly without squeaking. You should wipe the brass rail with a dry cloth and vacuum the ladder steps regularly to remove dust. Checking the roller hardware ensures the ladder remains safe to climb.
SAFETY WARNING: Ensure the sliding ladder is locked securely into position on the rail before climbing to prevent slips and falls.
Install Arch Shaped Shelf Tops

Designing the top section of your built-in shelves with arch-shaped openings softens the rigid rectangular lines of the room. The curved tops bring a beautiful architectural detail that makes the built-ins look custom-designed and elegant. The arch shape draws the eye upward, making your living room ceiling feel taller.
You can install arch inserts made from drywall or thin plywood into the top of the shelf frames before painting. Paint the curved panels the exact same black color as the shelves to create a seamless look.
Dust will collect quickly in the curved corners of the arches where the shelves meet the top trim. Because this area is high on the wall, you will need a step stool or a long-handled duster to clean it. Wiping the curved panels regularly prevents dust from building up and looking unsightly.
DESIGNER ADVICE: Paint the interior wall inside the arch a slightly lighter color to highlight the beautiful curved shape of the shelves.
Style with Black and White Family Photographs

Displaying framed black and white family photographs on your built-in shelves coordinates with a monochromatic color scheme. The black and white prints look clean and modern, keeping the focus on your family memories without adding bright, distracting colors. The photos bring a personal touch that makes the room feel cozy.
Choose matching frames in simple black wood or thin brass to keep the display looking organized and cohesive. Place the frames at different heights on the shelves, using horizontal book stacks to elevate smaller frames.
The glass covering your framed photographs will collect floating dust, fingerprints, and smudges from the air. A dirty glass frame makes the photos look dull and neglected, taking away from the clean look of the shelves. Wiping the frames weekly with a dry cloth and glass cleaner keeps the display looking crisp.
QUICK TIP: Use thick white matboards inside the frames to create a clean border that makes your small family photos stand out clearly.
Position a Pair of Symmetrical Sconces on the Side Panels

Mounting a pair of symmetrical lighting sconces on the outer side panels of your built-ins adds a beautiful frame to the unit. The warm light from the sconces illuminates the surrounding area, creating an inviting, cozy atmosphere in the evening. Symmetrical lighting gives the shelving unit a custom, professionally designed appearance.
Select fixtures with a warm brass or matte black finish that coordinates with your cabinet knobs and picture lights. Position the sconces at eye level to provide the most flattering and useful light for relaxing on the couch.
Metal lamp shades and sconce fixtures will collect floating dust from the air, which can make the metal look dull over time. Because the lights are mounted on the side of the unit, they are highly visible and must be kept clean. Wiping the fixtures with a dry microfiber cloth restores their original shiny appearance.
SAFETY WARNING: Ensure the light bulbs do not touch any nearby wooden shelves or fabric curtains to prevent fire hazards in the living room.
Use Leather Loop Pulls on the Bottom Drawers

Replacing standard handles with warm brown leather loop pulls on the lower drawers adds a cozy, tactile texture. The supple leather provides a beautiful contrast to the hard, smooth surface of the black painted wood. The natural tan color of the leather loops warms up the dark cabinets, looking modern and relaxed.
You can install the leather pulls yourself using a simple screwdriver and the brass screws that come with the hardware. The leather loop shape is comfortable to pull when opening the heavy bottom drawers.
Natural leather pulls can collect dirt, oils from your hands, and dust over time, which can darken or stain the tan color. You must handle the loops with clean hands to prevent staining the leather. Wiping the pulls with a slightly damp cloth occasionally keeps the leather clean and in good condition.
STYLE SECRET: Pair the tan leather pulls with a leather accent chair in the living room to create a cohesive look throughout the space.
Build a Fireplace Hearth in the Center

Integrating your black built-in shelves around a central fireplace hearth creates a stunning, cozy focus in the living room. The black shelves frame the fireplace, drawing the eye directly to the warm fire and making the seating area feel cozy. The masonry hearth provides a solid, traditional element that grounds the dark shelves.
Use a contrasting material for the fireplace surround, like white marble or light grey brick, to break up the black wood. Paint the mantel shelf the exact same black color as the shelves to tie the fireplace and built-ins together.
A fireplace hearth will collect ash, wood chips, and soot from the fire, which can quickly make the white stone look dirty. Because the hearth sits in the center of the built-ins, keeping it clean is important for a tidy room. Sweeping the hearth regularly prevents dirt from tracking onto your rugs.
SAFETY WARNING: Verify that all wooden shelves and trim are installed at the correct safety distance from the fireplace opening to comply with fire codes.
Display Textured Clay Pots and Stone Jugs

Displaying a collection of textured clay pots and stone jugs on your shelves introduces a rustic, matte texture that breaks up the black paint. The earthy colors and rough surfaces of the pots contrast nicely with the smooth, painted wood. Grouping similar pots together creates a simple, elegant display that feels grounded.
Use pots in a neutral color palette, like terracotta, cream, and charcoal grey, to match the color scheme of the living room. Place a few pots on different shelves to distribute the warm colors throughout the built-in unit.
Porous clay pots can absorb dust and soot from the fireplace air over time, which can dull their natural colors. Because the pots sit against a dark background, dust is highly visible on the textured surfaces. Wiping the pots with a dry brush and washing them occasionally keeps the display looking fresh.
QUICK TIP: Place small felt pads on the bottom of the heavy clay pots to prevent them from scratching the black paint on the shelves.
Keep the Shelving Spacing Asymmetrical

Designing your built-ins with asymmetrical shelf spacing creates a modern look that feels custom-built. Varying the height and width of the shelf openings allows you to display items of different sizes, like tall vases and wide art prints. This dynamic layout breaks up the rigid grid pattern of standard bookshelves.
You can adjust the heights of the shelves during installation to create different size openings across the unit. Use the tall sections to display sculptural items and the narrow sections to store horizontal stacks of books.
Asymmetrical shelves can look cluttered if too many items are crammed into the different size spaces. You must keep the arrangement organized and leave some empty space on each shelf to let the design breathe. Dusting the shelves weekly keeps the dynamic layout looking clean and tidy.
DESIGNER ADVICE: Place your largest, heaviest decorative items in the tallest shelf sections to balance the visual weight of the asymmetrical layout.
Tuck Cozy Wicker Storage Baskets on the Bottom Shelves

Tucking large woven wicker storage baskets onto the bottom shelves of your built-ins provides storage and a warm texture. The natural brown color of the baskets breaks up the dark black cabinets, making the lower section look cozy and organized. Baskets are perfect for hiding messy living room clutter out of sight.
Choose baskets with built-in handles so you can slide them out easily when you need to grab an item. Use the baskets to store children’s toys, extra throw blankets, or board games.
Woven wicker baskets can scratch the painted surface of the shelves when you slide them in and out of the cubbies. You should check that the baskets slide smoothly and apply felt pads to the bottom edges to protect the black paint. Vacuuming the baskets removes dust that gathers in the weave.
MAINTENANCE RULE: Vacuum the wicker baskets with a soft brush attachment every few weeks to remove dust and keep the natural fibers looking clean.
Frequently Asked Questions
Will black built-in shelves make my living room look too dark?
Black built-ins will not make your living room look dark if you balance the color with light elements. Paint the surrounding walls a crisp white, roll out a light-colored rug, and use bright decor on the shelves like white ceramic vases, light wood bowls, and warm LED lighting to create contrast.
How do I style black bookshelves without cluttering them?
To avoid a cluttered look, keep the styling simple and leave plenty of empty space on each shelf. Use a mix of books stacked both vertically and horizontally, group decorative items in small clusters, and use matching storage baskets on the bottom shelves to hide messy items out of sight.
What hardware looks best on black built-in cabinets?
Warm metallic hardware, like knurled brass or polished gold knobs, looks stunning against black cabinets because it provides a bright, luxurious contrast. If you want a more modern look, you can also use simple matte black edge pulls or natural tan leather loop handles.
How do I keep my black built-in shelves clean?
Black paint shows dust, fingerprints, and lint very easily. You must dust the shelves weekly using a soft microfiber cloth or a vacuum brush attachment. Wiping the wood surfaces with a damp cloth and mild soap removes sticky fingerprints and keeps the matte paint looking clean.
Conclusion
Styling black built-in shelves is a rewarding way to bring a bold, custom look to your living room. By balancing the dark paint with warm lighting, bright white ceramic accessories, and natural wood textures, you can create a display that is both highly functional and visually stunning. Implementing these styling tips ensures your built-in shelves remain a beautiful focus in your home for years to come.